

简介
通常来说,一个正常web页面是由图片和文字以及各种CSS,JS构成,而这其中,拖慢网速的罪魁祸首就是图片。懒加载即将页面中的图片分布加载,边浏览边加载,从而减轻服务器压力以及减轻流量的浪费。
LazyLoad
lazyload.js简介
Lazy Load是一个用js编写的jQuery插件,用来实现图片的延迟加载。只有在浏览器可视区域的图片才会被加载,没有滚动到的区域img标签上会有一个占位图片,而真实图片不会被载入。当页面比较长,图片比较多的时候,延迟加载图片可以加快页面加载速度,在某些情况下降低服务器负担。
原理分析
|
1 |
<img class="lazy" src="images/loading.gif" data-original="images/example.jpg" width="640" heigh="480"> |
将图片真实地址存放于data-original(这个可自定义),src属性用一个小的加载中动图占位,在用户浏览到该图片时,再将真实图片地址取出,实现"边浏览边加载",从而减轻服务器压力以及减轻流量的浪费。
优势
提升用户体验
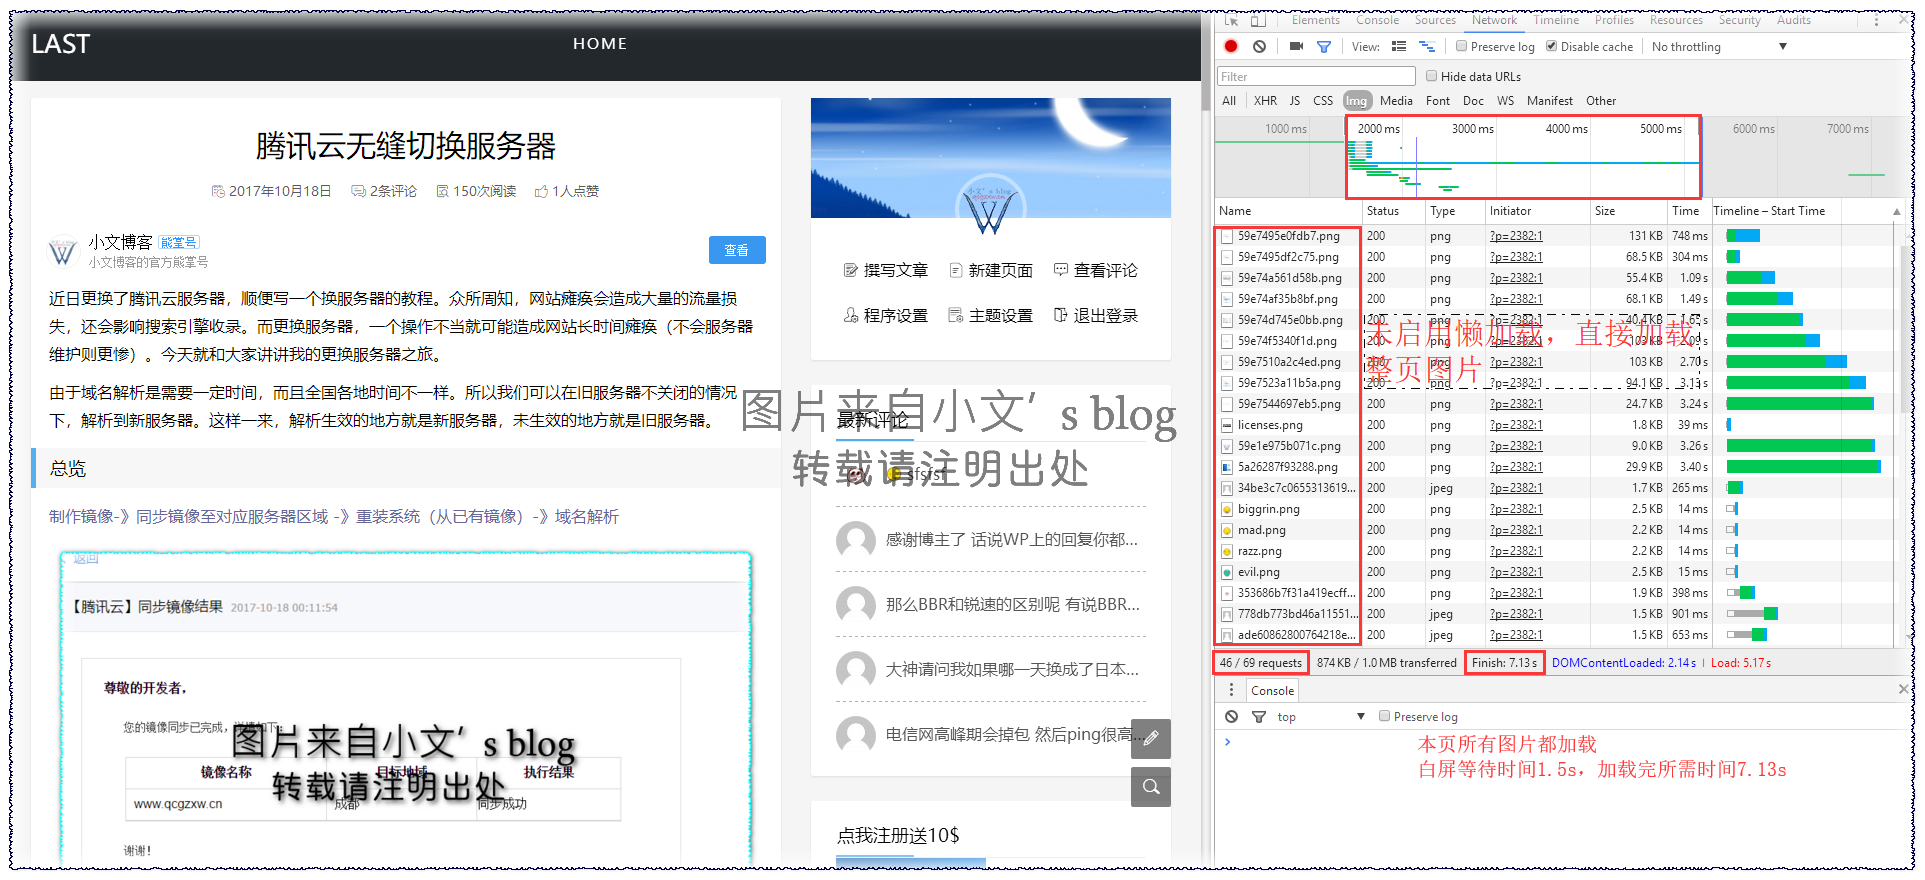
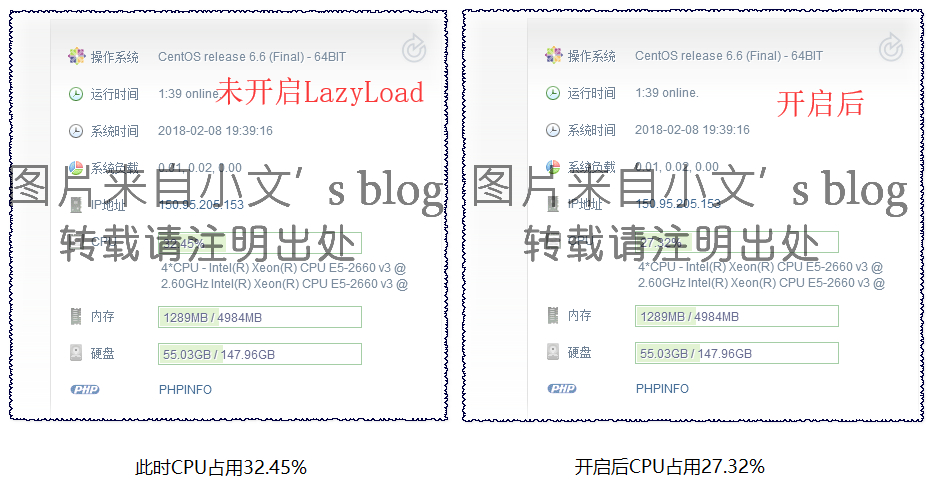
提升网页加载速度,用户浏览更流畅.(下图为开启lazyload前后的加载速度详图)


减轻服务器负担
lazyload将一次性加载完的网页资源分步加载,从而减轻了服务器的负担.

减少资源浪费
边浏览边加载,用户浏览到一半时退出即可省下不需要加载的图片流量。
通俗来讲就是 “喝多少倒多少”
战前准备
效果预览

准备工作
- WordPress博客
- Lazyload.js(本文提供下载) loading动图(文件已打包,也可以百度找资源)
- 一个聪明的大脑
文件下载
工作大纲
- 引入jquery.min.js和LazyLoad.js
- 图片链接转换
123<img src="images/example.jpg" width="640" heigh="480">//上转换下<img class="lazy" src="images/loading.gif" data-original="images/example.jpg" width="640" heigh="480"> - 需要懒加载的地方自行修改
WordPress站点部署LazyLoad
header引入JS
在主题文件夹header.php文件夹的适当位置加入以下代码
|
1 2 3 4 5 6 7 8 9 10 |
<script src="<?php%20echo%20get_template_directory_uri();%20?>/js/jquery.min.js" type="text/javascript"></script>//主题中已引用Jquery可省略这行 <script src="<?php%20echo%20get_template_directory_uri();%20?>/js/jquery.lazyload.min.js" type="text/javascript"></script> <script type="text/javascript"> $(function() { $("img").lazyload({ effect:"fadeIn" }); $("img").lazyload({ threshold : 200 }); }); </script> |
PS:以上代码必须<head>···</head>内,jquery.lazyload.min.js引用必须在jquery.min.js之后。
threshold:200(距离未加载图片200px时开始加载)为图片自动添加 data-original 属性
在主题文件夹function.php文件夹加入以下函数
|
1 2 3 4 5 6 7 8 9 10 |
//小文's blog图片链接添加data-original 属性函数 add_filter ('the_content', 'lazyload'); function lazyload($content) { $loadimg_url=get_bloginfo('template_directory').'/images/loading.gif';//loading图片地址,根据个人情况修改 if(!is_feed()||!is_robots) { $content=preg_replace('/<img(.+)src=[\'"]([^\'"]+)[\'"](.*)>/i',"<img\$1src=\"$loadimg_url\" data-original=\"\$2\"\$3>\n<noscript>\$0</noscript>",$content); } return $content; } //END |
在主题文件夹的/images/文件夹下添加loading图片(以下是本站的loading图片,可以自行百度)
云盘下载此时访问博客文章,即可实现懒加载的效果。
进阶篇——缩略图的懒加载
相信不少博客主题的首页文章排版都是 缩略图+文章摘要 的格式,其中的缩略图不少还是用timthumb 截图的。那么这种排版格式就给懒加载提供了便利,我们只需要小小改动一下代码。
对于缩略图,找到代码可能如下:
|
1 |
<img src="<?php%20bloginfo('template_url');%20?>/timthumb.php?src=<?php%20echo%20post_thumbnail_src();%20?>&h=150&w=200&zc=1" alt="<?php the_title(); ?>"/> |
那么修改为如下即可:
|
1 |
<img class="lazy" src="/image-pending.gif" data-original="<?php%20bloginfo('template_url');%20?>/timthumb.php?src=<?php%20echo%20post_thumbnail_src();%20?>&h=150&w=200&zc=1" alt="<?php the_title(); ?>"/> |
进阶篇——头像图片的懒加载
正常的话,头像的加载在WordPress 中是用诸如<?php echo get_avatar($user_email, 40); >的函数,在前台生成的html 代码其实也是img 标签,该函数其实与下面的代码差不多:
|
1 2 |
<img width="40" height="40" class="comments-widget-avatar alignleft" src="http://www.gravatar.com/avatar/'.md5(strtolower(get_comment_author_email())).'?s=40&r=g "> |
要部署懒加载,先将<?php echo get_avatar($user_email, 40); >函数改为如上面的代码,然后再改为如下:
|
1 2 |
<img width="40" height="40" class="lazy comments-widget-avatar alignleft" src="/image-pending.gif" data-original ="http://www.gravatar.com/avatar/'.md5(strtolower(get_comment_author_email())).'?s=40&r=g "> |
更多玩法可以在文章下留言!